DHT sensors
The DHT22 Family sensors are low cost sensors that are very practical for quick prototyping or small project ideas. In this article we'll learn about the sensors, compare between them and finally write code to receive temperature and humidity input in real time.
Only DHT11 included with the kit
DHT11 and DHT22 are very similar and the kit only includes DH11 sensor, the article compare the sensors as well as shows how to write code that will work on both of them, keep in mind there is only one DHT11 sensor included with the kit.
Type of sensors
There are 2 main sensors in the DHTxx Family - The DHT11 and the DHT22. AM2302 is considered to be DHT22 with extension wires instead of direct pins.
DHT11
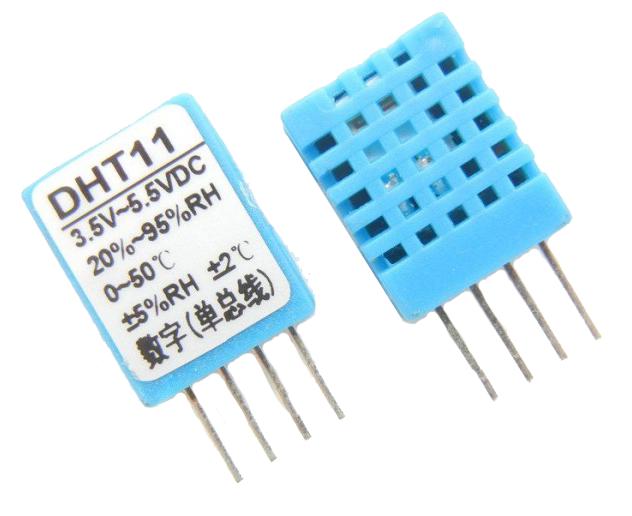
DHT11 Temperature & Humidity Sensor features a temperature & humidity sensor complex with a calibrated digital signal output.
By using the exclusive digital-signal-acquisition technique and temperature & humidity sensing technology, it ensures high reliability and excellent long-term stability. This sensor includes a resistive-type humidity measurement component and an NTC temperature measurement component, and connects to a high performance 8-bit microcontroller, offering excellent quality, fast response, anti-interference ability and cost-effectiveness
The complete data sheet for DHT11 can be found here: Mouser.com DHT11 datasheet
DHT22 / AM2302
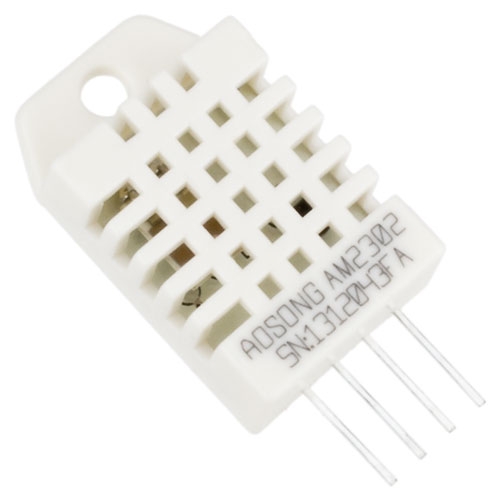
DHT22 (as well as AM2302) output calibrated digital signal. It applys exclusive digital-signal-collecting-technique and humidity sensing technology, assuring its reliability and stability. Its sensing elements is connected with 8-bit single-chip computer.
The DHT22 and AM2302 are basically the same sensor except the AM2302 have external wire that you can solder to the board as extension instead of soldering the sensor directly.
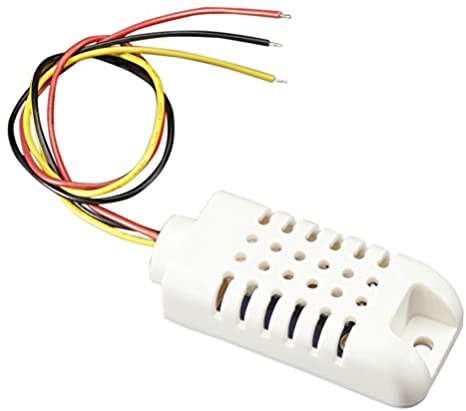
The complete data sheet for DHT22 and AM2302 can be found here: adafruit.com DHT22/AM2302 datasheet
Features
The DHT11 and DHT22 features have small differences, which one is better? depends on the application. let's take a look at each sensor features so we'll know which one to apply to which project.
DHT11
Each DHT11 sensor is calibrated in a special laboratory that is extremely accurate on humidity calibration.
The calibration coefficients are stored in the program OTP memory, which is used by the sensor’s internal signal detecting process. The single-wire serial interface makes system integration quick and easy. Its small size, low power consumption, and up-to-20 meter signal transmission making it the best choice for various applications, including those most demanding ones. The component is a 4-pin single row pin package.
- Ultra low cost
- 3 to 5V power and I/O
- 2.5mA max current use during conversion (while requesting data)
- Good for 20-80% humidity readings with 5% accuracy
- Good for 0-50°C temperature readings ±2°C accuracy
- No more than 1 Hz sampling rate (once every second)
- Body size 15.5mm x 12mm x 5.5mm
- 4 pins with 0.1" spacing
DHT22 / AM2302
Every sensor of this model is temperature compensated and calibrated in accurate calibration chamber and the calibration-coefficient is saved in type of program in OTP memory, when the sensor is detecting, it will cite coefficient from memory.
Small size & low consumption & long transmission distance(100m) enable AM2302 to be suited in all kinds of harsh application occasions. Single-row packaged with four pins, making the connection very convenient.
- Low cost
- 3 to 5V power and I/O
- 2.5mA max current use during conversion (while requesting data)
- Good for 0-100% humidity readings with 2-5% accuracy
- Good for -40 to 80°C temperature readings ±0.5°C accuracy
- No more than 0.5 Hz sampling rate (once every 2 seconds)
- Body size 15.1mm x 25mm x 7.7mm
- 4 pins with 0.1" spacing
Scientific principle
The humidity sensor used in the DHTxx series is a substance called as the "Polymer resistance type" and the sensor principle using this polymer membrane is described here. The Polymer membrane humidity sensor measures the relative humidity of the atmosphere from the electric permittivity change accompanying the absorption and emission of moisture of the polymer membrane. Basically, a condenser built as shown below can work as a humidity sensor and the electric permittivity change of the polymer membrane can be measured as the capacitance change of the condenser. The electrode is an extremely thin metal deposition film and the polymer membrane absorbs and emits moisture through the electrode.
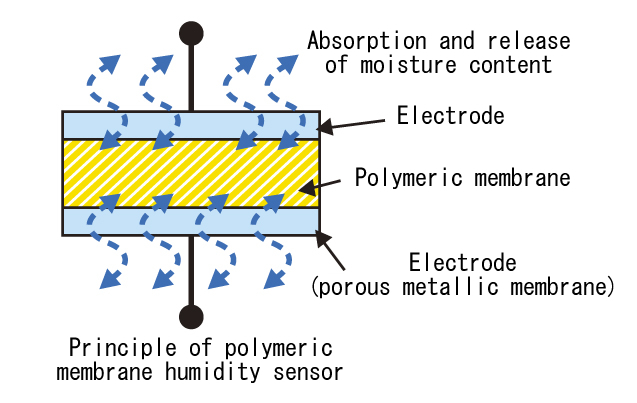
There are "Capacitance type" and "Resistance type" Polymer membrane humidity sensors.
-
Capacitance Type: The cellulose type hydrophilic polymer uses the property that the capacitance of wet and dry materials changes according to the amount of moisture adsorbed. Its distinctive features are wide measurement range (0 - 100%RH), faster response speed and it gives a linear output for relative humidity.
-
Resistance Type (used in PAU) : It uses the property that the resistance of quaternary ammonium salt and sulfonic acid group based wet and dry spherical materials reduces due to moisture absorption. The resistance type humidity sensor has a simple structure, can be mass produced and are relatively inexpensive. In addition, though it has a linear output, since it produces a straight line against the index the resolution is bad as compared to the capacitance type.
In addition to that, they also consist of a NTC temperature sensor/Thermistor to measure temperature. A thermistor is a thermal resistor – a resistor that changes its resistance with temperature. Technically, all resistors are thermistors – their resistance changes slightly with temperature – but the change is usually very very small and difficult to measure.
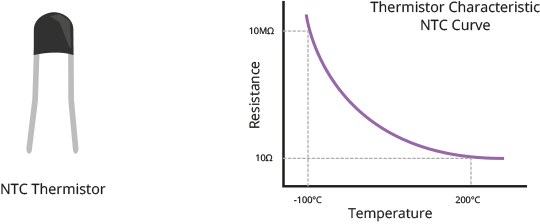
Thermistors are made so that the resistance changes drastically with temperature so that it can be 100 ohms or more of change per degree! The term “NTC” means “Negative Temperature Coefficient”, which means that the resistance decreases with increase of the temperature.
Hardware explained
Now when we know the differences between DHT11 and DHT22 as well as the scientific principles they work on, let's read some diagrams to understand how to connect the sensors to our micro-controllers and write some code to get it to work.
In the diagram you'll see we have to use a resistor between 4.7K and 10K (resistors included in the kit) this is used in order to avoid disruption and stabilize the signal.
The diagrams show DHT11 but will work both on DHT11 and DHT22
Because our kit only includes DHT11 we will use that sensor to show diagrams but keep in mind that both DHT11 and DHT22 can be connected in the same way using the same diagrams.
Raspberry Pi wiring diagram
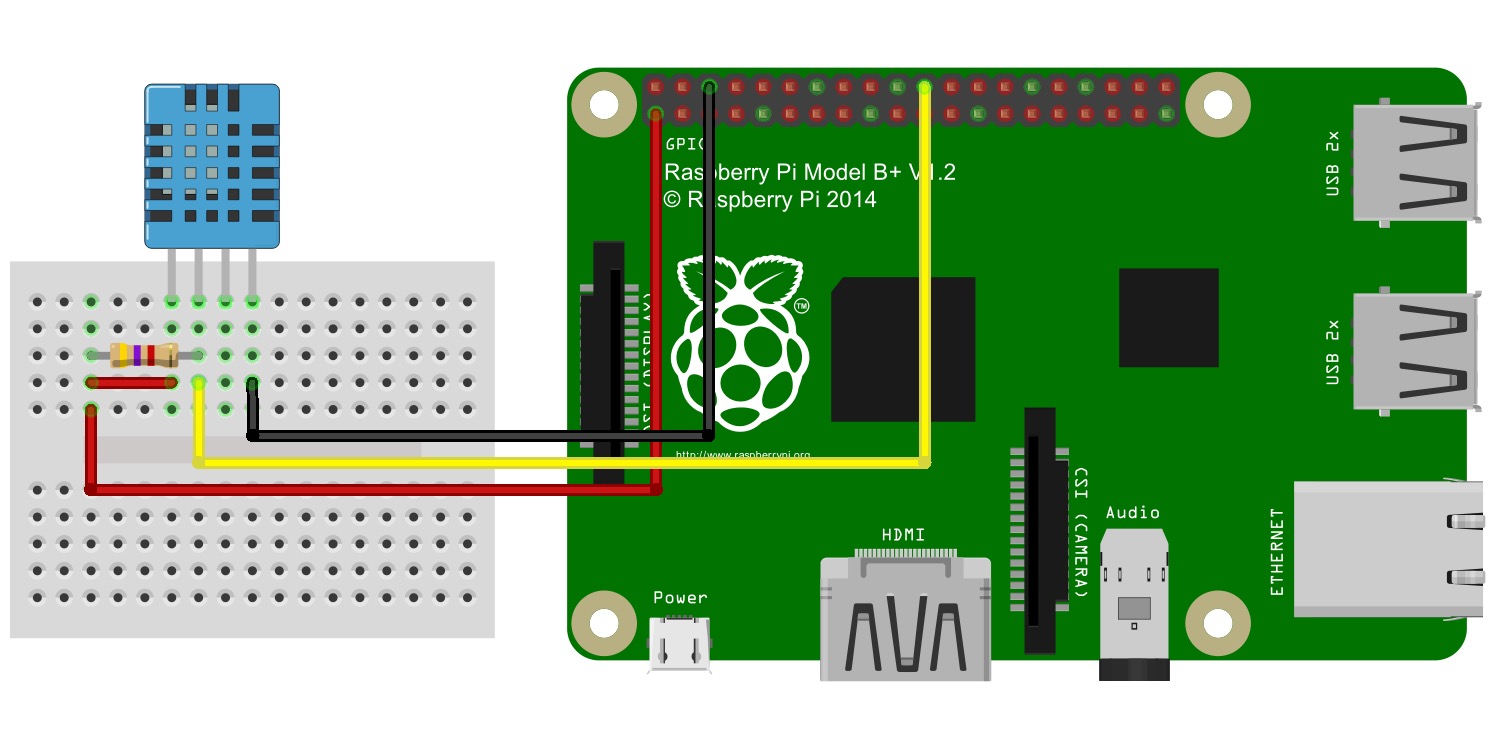
The DHT11 has 4 pins: VCC, SIG (DATA), N and GND (N stands for natural, we don't connect it to anything).
VCC goes to 3.3V or 5V output in the Raspberry Pi (we suggest to go with 3.3V), GND (black negative wire) goes to GND and SIG (data, the yellow wire) need to connect between a resistor of 4.7K to 10K (any number between will work, for our example we use 4.7K), one side of the resistor connects to SIG (data) the other side to VCC and the rest of the wire goes to GPIO PIN 25 (GPIO.BCM).
Arduino wiring diagram
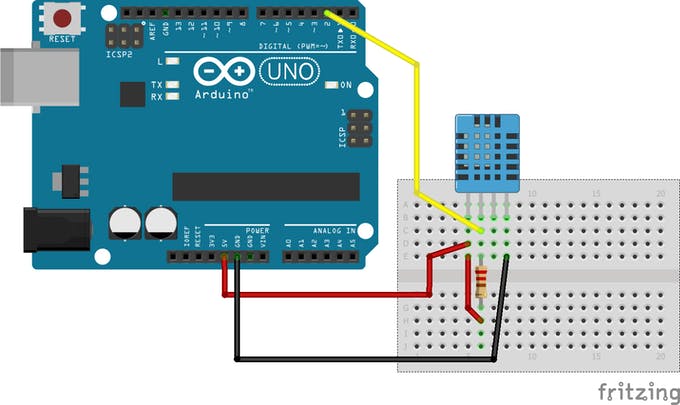
For the Arduino we follow similar principle, the sensor is the same with 4 pins (VCC, GND, SIG, N). The VCC goes to 5V, GND goes to GND and SIG goes through resistor and then connects to digital pin 2, the natural we don't connect it to anything (third pin on the DHT sensor when it's facing us).
ESP32 / ESP8266 wiring diagram
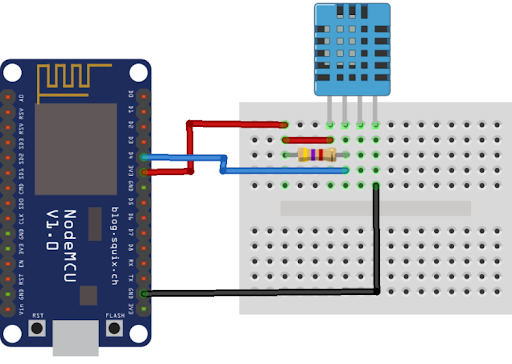
For the ESP example in the picture above we can see NodeMCU which is based on ESP8266 but it will work both for ESP32 and ESP8266 the same way. As before, 4 pins (VCC, GND, SIG, N) VCC goes to 5V, GND goes to GND and SIG through resistor connects to digital pin number 4.
Software explained
The software is very straight forward, for the raspberry pi you'll need to install some extra libraries (the Adafruit DHT library) link can be found here: Adafruit DHT library
Although it says it's deprecated it should work perfectly fine. the reason they deprecated the library is due to Adafruit preference to focus on their own framework instead of the official Python3 programing language.
For the Arduino IDE we will use Adafruit library as well which is available from here: Adafruit DHT-sensor-library
MicroPython is probably the easiest one as they include build in the DHT11 library so it's very easy to import and use it right away.
DHT11
In the example below we can see MicroPython, Arduino, Python3 and ESP-Arduino examples for DHT11
import sys
import time
import Adafruit_DHT


now = time.strftime("%c")

sensor = 11
pin = 25

humidity, temperature = Adafruit_DHT.read_retry(sensor, pin)

# Un-comment the line below to convert the temperature to Fahrenheit.
# temperature = temperature * 9/5.0 + 32

if humidity is not None and temperature is not None:
    print(now + ' - '+ 'Temp={0:0.1f}*  Humidity={1:0.1f}%'.format(temperature, humidity))
else:
    print('Failed to get reading. Try again!')
    sys.exit(1)
import dht
import machine

# initialize dht object, DHT11 coonected to IO34 (ESP-32 / ESP-8266)
d = dht.DHT11(machine.Pin(4))

# measure sensor data
d.measure()

# get data
temp = d.temperature()
humidity = d.humidity()

# uncomment for temperature in Fahrenheit
#temp = (temp / 100) * (9/5) + 32
#temp = str(round(temp, 2))

# print temperature and humidity
print("temperature : %s" % temp)
print("humidity : %s" % humidity)
#include "DHT.h"

#define DHTPIN 4     // Digital pin connected to the DHT sensor

// Uncomment whatever type you're using!
#define DHTTYPE DHT11   // DHT 11
//#define DHTTYPE DHT22   // DHT 22  (AM2302), AM2321
//#define DHTTYPE DHT21   // DHT 21 (AM2301)

// Initialize DHT sensor.
// Note that older versions of this library took an optional third parameter to
// tweak the timings for faster processors.  This parameter is no longer needed
// as the current DHT reading algorithm adjusts itself to work on faster procs.

DHT dht(DHTPIN, DHTTYPE);

void setup() {
  Serial.begin(115200);
  Serial.println(F("DHTxx test!"));
  dht.begin();
}

void loop() {
  // Wait a few seconds between measurements.
  delay(2000);

  // Reading temperature or humidity takes about 250 milliseconds!
  // Sensor readings may also be up to 2 seconds 'old' (its a very slow sensor)
  float h = dht.readHumidity();
  // Read temperature as Celsius (the default)
  float t = dht.readTemperature();
  // Read temperature as Fahrenheit (isFahrenheit = true)
  float f = dht.readTemperature(true);

  // Check if any reads failed and exit early (to try again).
  if (isnan(h) || isnan(t) || isnan(f)) {
    Serial.println(F("Failed to read from DHT sensor!"));
    return;
  }

  // Compute heat index in Fahrenheit (the default)
  float hif = dht.computeHeatIndex(f, h);
  // Compute heat index in Celsius (isFahreheit = false)
  float hic = dht.computeHeatIndex(t, h, false);

  Serial.print(F("Humidity: "));
  Serial.print(h);
  Serial.print(F("%  Temperature: "));
  Serial.print(t);
  Serial.print(F("°C "));
  Serial.print(f);
  Serial.print(F("°F  Heat index: "));
  Serial.print(hic);
  Serial.print(F("°C "));
  Serial.print(hif);
  Serial.println(F("°F"));
}
#include "DHT.h"

#define DHTPIN 2     // Digital pin connected to the DHT sensor

// Uncomment whatever type you're using!
#define DHTTYPE DHT11   // DHT 11
//#define DHTTYPE DHT22   // DHT 22  (AM2302), AM2321
//#define DHTTYPE DHT21   // DHT 21 (AM2301)

// Initialize DHT sensor.
// Note that older versions of this library took an optional third parameter to
// tweak the timings for faster processors.  This parameter is no longer needed
// as the current DHT reading algorithm adjusts itself to work on faster procs.

DHT dht(DHTPIN, DHTTYPE);

void setup() {
  Serial.begin(115200);
  Serial.println(F("DHTxx test!"));
  dht.begin();
}

void loop() {
  // Wait a few seconds between measurements.
  delay(2000);

  // Reading temperature or humidity takes about 250 milliseconds!
  // Sensor readings may also be up to 2 seconds 'old' (its a very slow sensor)
  float h = dht.readHumidity();
  // Read temperature as Celsius (the default)
  float t = dht.readTemperature();
  // Read temperature as Fahrenheit (isFahrenheit = true)
  float f = dht.readTemperature(true);

  // Check if any reads failed and exit early (to try again).
  if (isnan(h) || isnan(t) || isnan(f)) {
    Serial.println(F("Failed to read from DHT sensor!"));
    return;
  }

  // Compute heat index in Fahrenheit (the default)
  float hif = dht.computeHeatIndex(f, h);
  // Compute heat index in Celsius (isFahreheit = false)
  float hic = dht.computeHeatIndex(t, h, false);

  Serial.print(F("Humidity: "));
  Serial.print(h);
  Serial.print(F("%  Temperature: "));
  Serial.print(t);
  Serial.print(F("°C "));
  Serial.print(f);
  Serial.print(F("°F  Heat index: "));
  Serial.print(hic);
  Serial.print(F("°C "));
  Serial.print(hif);
  Serial.println(F("°F"));
}
DHT22
In the example below we can see MicroPython, Arduino, Python3 and ESP-Arduino examples for DHT22
import sys
import time
import Adafruit_DHT


now = time.strftime("%c")

sensor = 22
pin = 25

humidity, temperature = Adafruit_DHT.read_retry(sensor, pin)

# Un-comment the line below to convert the temperature to Fahrenheit.
# temperature = temperature * 9/5.0 + 32

if humidity is not None and temperature is not None:
    print(now + ' - '+ 'Temp={0:0.1f}*  Humidity={1:0.1f}%'.format(temperature, humidity))
else:
    print('Failed to get reading. Try again!')
    sys.exit(1)
import dht
import machine

# initialize dht object, DHT22 coonected to IO34 (ESP-32 / ESP-8266)
d = dht.DHT22(machine.Pin(4))

# measure sensor data
d.measure()

# get data
temp = d.temperature()
humidity = d.humidity()

# uncomment for temperature in Fahrenheit
#temp = (temp / 100) * (9/5) + 32
#temp = str(round(temp, 2))

# print temperature and humidity
print("temperature : %s" % temp)
print("humidity : %s" % humidity)
#include "DHT.h"

#define DHTPIN 4     // Digital pin connected to the DHT sensor

// Uncomment whatever type you're using!
//#define DHTTYPE DHT11   // DHT 11
#define DHTTYPE DHT22   // DHT 22  (AM2302), AM2321
//#define DHTTYPE DHT21   // DHT 21 (AM2301)

// Initialize DHT sensor.
// Note that older versions of this library took an optional third parameter to
// tweak the timings for faster processors.  This parameter is no longer needed
// as the current DHT reading algorithm adjusts itself to work on faster procs.

DHT dht(DHTPIN, DHTTYPE);

void setup() {
  Serial.begin(115200);
  Serial.println(F("DHTxx test!"));
  dht.begin();
}

void loop() {
  // Wait a few seconds between measurements.
  delay(2000);

  // Reading temperature or humidity takes about 250 milliseconds!
  // Sensor readings may also be up to 2 seconds 'old' (its a very slow sensor)
  float h = dht.readHumidity();
  // Read temperature as Celsius (the default)
  float t = dht.readTemperature();
  // Read temperature as Fahrenheit (isFahrenheit = true)
  float f = dht.readTemperature(true);

  // Check if any reads failed and exit early (to try again).
  if (isnan(h) || isnan(t) || isnan(f)) {
    Serial.println(F("Failed to read from DHT sensor!"));
    return;
  }

  // Compute heat index in Fahrenheit (the default)
  float hif = dht.computeHeatIndex(f, h);
  // Compute heat index in Celsius (isFahreheit = false)
  float hic = dht.computeHeatIndex(t, h, false);

  Serial.print(F("Humidity: "));
  Serial.print(h);
  Serial.print(F("%  Temperature: "));
  Serial.print(t);
  Serial.print(F("°C "));
  Serial.print(f);
  Serial.print(F("°F  Heat index: "));
  Serial.print(hic);
  Serial.print(F("°C "));
  Serial.print(hif);
  Serial.println(F("°F"));
}
#include "DHT.h"

#define DHTPIN 2     // Digital pin connected to the DHT sensor

// Uncomment whatever type you're using!
//#define DHTTYPE DHT11   // DHT 11
#define DHTTYPE DHT22   // DHT 22  (AM2302), AM2321
//#define DHTTYPE DHT21   // DHT 21 (AM2301)

// Initialize DHT sensor.
// Note that older versions of this library took an optional third parameter to
// tweak the timings for faster processors.  This parameter is no longer needed
// as the current DHT reading algorithm adjusts itself to work on faster procs.

DHT dht(DHTPIN, DHTTYPE);

void setup() {
  Serial.begin(115200);
  Serial.println(F("DHTxx test!"));
  dht.begin();
}

void loop() {
  // Wait a few seconds between measurements.
  delay(2000);

  // Reading temperature or humidity takes about 250 milliseconds!
  // Sensor readings may also be up to 2 seconds 'old' (its a very slow sensor)
  float h = dht.readHumidity();
  // Read temperature as Celsius (the default)
  float t = dht.readTemperature();
  // Read temperature as Fahrenheit (isFahrenheit = true)
  float f = dht.readTemperature(true);

  // Check if any reads failed and exit early (to try again).
  if (isnan(h) || isnan(t) || isnan(f)) {
    Serial.println(F("Failed to read from DHT sensor!"));
    return;
  }

  // Compute heat index in Fahrenheit (the default)
  float hif = dht.computeHeatIndex(f, h);
  // Compute heat index in Celsius (isFahreheit = false)
  float hic = dht.computeHeatIndex(t, h, false);

  Serial.print(F("Humidity: "));
  Serial.print(h);
  Serial.print(F("%  Temperature: "));
  Serial.print(t);
  Serial.print(F("°C "));
  Serial.print(f);
  Serial.print(F("°F  Heat index: "));
  Serial.print(hic);
  Serial.print(F("°C "));
  Serial.print(hif);
  Serial.println(F("°F"));
}