RGB based sensors indicators
Previously we've discussed how WS2812B RGB LED can be useful in multiple applications and we've created a simple example how to change the RGB colors and brightness.
Let's take it one step forward and combine the RGB with other sensors such as the water level sensor, soil moisture, temperature and humidity and more
to create interactive light based on the value changes of those sensors.
In this tutorials you might notice we used Try and except KeyboardInterrupt, The reason is that as long as the script runs in "while" loop the only way to shut it down is by interruption, while we interrupt the script the RGB will freeze in it's last state (the last used color).
To overcome this situation, we except a keyboard interrupt event and manually turn off the LED after we finished with our program.
Water level indication
In this example we will change the WS2812B RGB LED color between green and red to indicate if our water container is empty or not.
If it's empty - we'll change the RGB LED to red color else we'll make it green.
in the code, we wrap everything around "while" loop to let our program check the quantity of the water every second and change the LED accordingly.
If the water container is empty, the function is_empty() will return True (the sensor output HIGH when no water detected) and LOW if water detected.
After setting np[0] (remember, we only have one LED at place 0) with the color we want, we need to remember to save changes using np.write() command.
import machine, neopixel
import time

# define water level sensor as INPUT on IO pin number 21
water_level = machine.Pin(21, machine.Pin.IN)
# Configure the RGB LED at IO pin 14 (1 indicates 1 LED)
np = neopixel.NeoPixel(machine.Pin(14), 1)

def is_empty():
    # will return 0 if container have no water and 1 if it has water
    return water_level.value()

try:
    while True:
        if(is_empty()):
            print("[-] You don't have water in the container")
            np[0] = (255, 0, 0) # set to red, full brightness
        else:
            print("[-] The water container has sufficient amount of water")
            np[0] = (0, 255, 0) # set to green, full brightness
        # save changes
        np.write() # save changes
        # wait one second before checking again
        time.sleep(1)
except KeyboardInterrupt:
    # keyboard interrupt, let's turn off LED
    np[0] = (0, 0, 0)
    np.write()
Soil moisture indication
Previously in the soil moisture tutorial we've showed how to get percentage of approximately how much water our plant submerged in.
in this part we'll combine one more functionality - the RGB LED. using the LED we can indicate whenever the plant has enough water or not.
We'll use 3 colors: RED, YELLOW and GREEN. the red color will indicate the soil moisture is in critical levels, the yellow color will give us warning that we might need to water our plant and the green color will let us know everything is alright and we have nothing to worry about.
from machine import ADC,Pin
import neopixel
import time

# set max val and min val of the sensor
# this requires manual calibration
# minVal get be recieved by putting the sensor submerged in the water
# maxVal can be recieved by making sure the sensor is dry in the clear air
minVal = 710
maxVal = 4095
# configure neopixel
np = neopixel.NeoPixel(Pin(14), 1)

def value_in_percentage(val):
    # scale the value based on maxVal and minVal
    scale = 100 / (minVal - maxVal)
    # get calculated scale
    normal_reading = ("%s%s" % (int((val - maxVal) * scale),"%"))
    # we can also get inverted value if needed
    inverted_reading = ("%s%s" % (int((minVal - val) * scale),"%"))
    # for this example we'll return only the normal reading
    return normal_reading

# set adc (analog to digital) on pin 35
adc = ADC(Pin(35))
# read analog input
adc.read()
# set 11dB input attenuation (voltage range roughly 0.0v - 3.6v)
adc.atten(ADC.ATTN_11DB)

# keep running the software till we stop it manually.
try:
    while True:
        # get sensor value
        value = adc.read()
        # get the value in percentage, convert it to int
        estimated = int(value_in_percentage(value).replace("%",""))
        if(estimated >= 0 and estimated < 35):
            # turn RED color, it's critical
            np[0] = (255, 0, 0) # set to red, full brightness
        if(estimated >= 35 and estimated < 65):
            # turn YELLOW color, it's alright for now
            np[0] = (255, 255, 0) # set to yellow, full brightness
        if(estimated >= 65 and estimated <= 100):
            # turn GREEN color, we have enough water
            np[0] = (0, 255, 0) # set to green, full brightness
        # write changes of the RGB LED color
        np.write()
        # print the analog results (moisture)
        print("sensor value: %s" % value)
        print("sensor value in percentage: %s" % value_in_percentage(value))
        # sleep for 1 second
        time.sleep(1)
except KeyboardInterrupt:
    # keyboard interrupt, let's turn off LED
    np[0] = (0, 0, 0)
    np.write()
Temperature / Humidity indication
Let's understand more about what is right or wrong temperature for the plants by the following chart made by the ministry of environment in Canada:
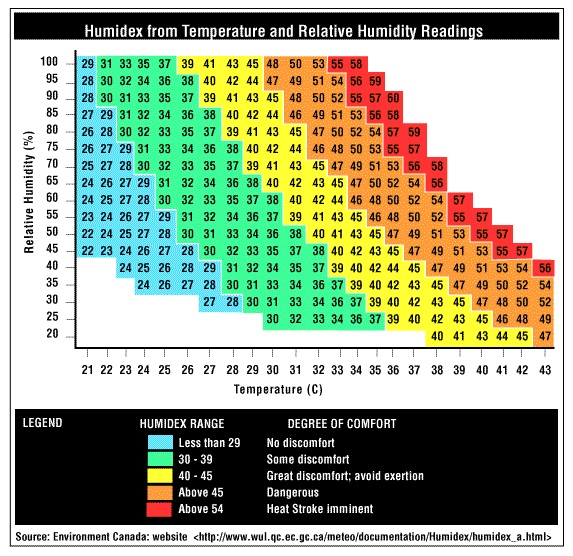
The X axis represents the temperature while the Y axis represents the humidity. We can match them both in order to find the optional temperature and humidity on how to behave during heat waves. Humidex provides a crucial information on how to behave during certain temperature and humidity situations to avoid damage to humans such as workers that work outdoors, kids at schools and more ...
Not all plants are the same, changes in the variables might be required
each plant is different, if you know the optimal temperature/humidity for your plant you should consider using your known data points instead. humidex might not be the right solution for your build so you can consider other alternatives.
The graph above is called "Humidex chart" from wikipedia:
The humidex (short for humidity index) is an index number used by Canadian meteorologists to describe how hot the weather feels to the average person, by combining the effect of heat and humidity. The term humidex was first coined in 1965.
The humidex is a nominally dimensionless quantity (though generally recognized by the public as equivalent to the degree Celsius) based on the dew point.
In order to find the humidex value we need 2 parameters:
- Temperature (in celsius)
- Himidity (in celsius)
This 2 variables we can get using our temperature and humidity sensor.
But, we will need few more things which the sensor won't provide us directly. the first thing will be something called "dew point" which is the temperature at which the air is saturated (100 percent relative humidity).
Don't worry, we have a formulate to get this thing ready for us:
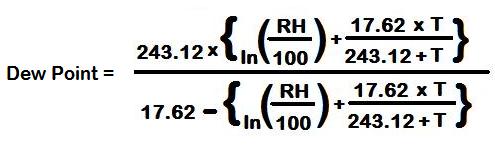
Where RH stands for "relative humidity" the humidity we get through our temperature and humidity sensor. The results of this formula will be in celsius but to calculate humidex we'll need the result in Kelvin, the formula for celsius to kevin is quite easy:
dewpoint_k = (dewpoint_c + 273.15)
Now when we have the depoint in Kavin, it's time to get the humidex value, the formula as follows:
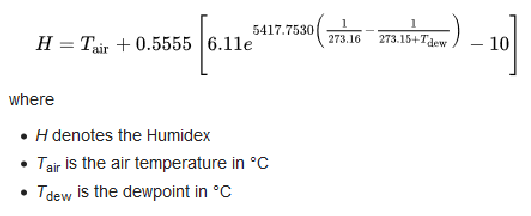
Looks quite complicated right? no worries, we've implemented it in Python already in the example that will come up next. The graph itself already state for us the necessary values:
- Less than 29 - No discomfort
- 30-39 - Some discomfort
- 40 > - Great discomfort
The "discomfort" chart is for humans but we can use it for plants as well, if you feel it's extremely hot and dry outside your plant will probably feel the same and maybe on even much larger scale. again, depends on the type of plant you have.
To finalize everything we learned let's write the Python Code:
import dht
from machine import Pin
import math
import neopixel
import time

def calculate_humidex(T,RH):
    # find dewpoint in celsius
    dewpoint_c = 243.04 * (math.log(RH/100,math.e)+((17.625*T)/(243.04+T)))/(17.625-math.log(RH/100,math.e)-((17.625*T)/(243.04+T)))
    # convert celsius to Kelvin
    dewpoint_k = (dewpoint_c + 273.15)
    # find the humidex using the dewpoint we found earlier
    humidex = T + (0.5555)*(6.11 * math.exp(5417.7530 * ((1/273.16) - (1/dewpoint_k))) - 10.0)
    # return  humidex
    return humidex

# initialize dht object, DHT11 coonected to IO19
d = dht.DHT11(Pin(19))
# configure neopixel
np = neopixel.NeoPixel(Pin(14), 1)

try:
    while True:
        # measure sensor data
        d.measure()
        # get temperature and humidity
        temperature = d.temperature()
        humidity = d.humidity()
        # get humidex
        humidex = calculate_humidex(temperature,humidity)

        # check the value of the humidex
        if(humidex > 0 and humidex < 29):
            # Turn on green RGB
            np[0] = (0, 255, 0) # set to green, full brightness
        if(humidex >= 30 and humidex <= 39):
            # Turn on yellow RGB
            np[0] = (255, 255, 0) # set to red, full brightness
        if(humidex > 40):
            # Turn on red RGB
            np[0] = (255, 0, 0) # set to red, full brightness

        # write the data to the RGB
        np.write()
        # print temperature and humidity
        print("--------------------------")
        print("temperature : %s" % temperature)
        print("humidity : %s" % humidity)
        print("humidex : %s" % humidex)
        print("--------------------------")
        print("")
        # sleep for 1 second
        time.sleep(1)
except KeyboardInterrupt:
    # keyboard interrupt, let's turn off LED
    np[0] = (0, 0, 0)
    np.write()
To summarize what the python code will do: use the function calculate_humidex which is based on the previous formulas we've studied to calculate the humidex value based on the current temperature and humidity. Then, it will run a loop as long as the keyboard does not interrupt it to measure temperature and humidity and check if the value is good, normal or bad and change the RGB LEDs accordingly.
Light indication
Each plant need different amount of light and that's a fact. We've found this great document by the University Of Melbourne that explains amount of light required for indoor plants in lux (Lumens per square metre).
By that University made document we can understand few levels of lights that we can configure:
- Low – range 270 to 807Lux
- Medium – range of 807 to 1614 Lux.
- High – range 1614 to 10764 Lux
As in previous examples we'll configure 3 main colors: red for low, yellow for medium and green for high. We will use the light class we've made earlier and combine it with the Neopixel functionality to turn on different RGB color at different state of light.
import machine, neopixel
import time

class LightSensor():

    def __init__(self):

        # Define some constants from the datasheet

        self.DEVICE = 0x5c # Default device I2C address

        self.POWER_DOWN = 0x00 # No active state
        self.POWER_ON = 0x01 # Power on
        self.RESET = 0x07 # Reset data register value

        # Start measurement at 4lx resolution. Time typically 16ms.
        self.CONTINUOUS_LOW_RES_MODE = 0x13
        # Start measurement at 1lx resolution. Time typically 120ms
        self.CONTINUOUS_HIGH_RES_MODE_1 = 0x10
        # Start measurement at 0.5lx resolution. Time typically 120ms
        self.CONTINUOUS_HIGH_RES_MODE_2 = 0x11
        # Start measurement at 1lx resolution. Time typically 120ms
        # Device is automatically set to Power Down after measurement.
        self.ONE_TIME_HIGH_RES_MODE_1 = 0x20
        # Start measurement at 0.5lx resolution. Time typically 120ms
        # Device is automatically set to Power Down after measurement.
        self.ONE_TIME_HIGH_RES_MODE_2 = 0x21
        # Start measurement at 1lx resolution. Time typically 120ms
        # Device is automatically set to Power Down after measurement.
        self.ONE_TIME_LOW_RES_MODE = 0x23
        # setup I2C
        self.i2c = machine.I2C(scl=machine.Pin(15), sda=machine.Pin(4))

    def convertToNumber(self, data):

        # Simple function to convert 2 bytes of data
        # into a decimal number
        return ((data[1] + (256 * data[0])) / 1.2)

    def readLight(self):

        data = self.i2c.readfrom_mem(self.DEVICE,self.ONE_TIME_HIGH_RES_MODE_1,2)
        return self.convertToNumber(data)

# Configure the RGB LED at IO pin 14 (1 indicates 1 LED)
np = neopixel.NeoPixel(machine.Pin(14), 1)
# Configure light sensor
sensor = LightSensor()

try:
    while True:
        # get amount of light
        light = int(sensor.readLight())
        # check amount of light
        if(light <= 807):
            # low light, turn on red RGB
            np[0] = (255, 0, 0)
        elif(light > 807 and light <= 1614):
            # medium light, turn on yellow RGB
            np[0] = (255, 255, 0)
        elif(light > 1614):
            # high light, turn on green RGB
            np[0] = (0, 255, 0)
        # Save changes to RGB
        np.write()
        # Print amount of light in lux
        print("Light in the room: %slux" % light)
        # Sleep 1 second
        time.sleep(1)
except KeyboardInterrupt:
    # keyboard interrupt, let's turn off LED
    np[0] = (0, 0, 0)
    np.write()