Basic MQTT client
In this article we'll build a simple MQTT client that publish static data at specific interval.
We'll use the "smart home" scenario where we have lights at home, we'll publish data through the MQTT broker and finally read the data in real time.
This article doesn't have much real-life use using our Eduponics Mini but it will give you a glance and easy understand of how MQTT works. in our next article we'll integrate into our client all the Eduponics Mini sensor and send them over the MQTT network to our mobile app - The Eduponics APP.
Install mosquitto CLI on your PC/Mac/Linux
At the end of this guide we'll be able to publish static data at interval from our Eduponics Mini to the MQTT public broker. in order to listen (subscribe) to the data and see when it goes through, we'll need to install the mosquitto CLI into our machine.
The installation is fairly easy and mosquitto.org gives instructions and binary to download for each machine, follow the instructions in mosquitto.org website to install the binary that is suitable for you: MQTT mosquitto.org CLI download
Connecting Eduponics Mini to WiFi
The first thing you might be asking yourself "how does the Eduponics mini communicate with the cloud without wireless connectivity?"
Well, the good news is ESP32, the microcontroller that the Eduponics mini uses includes WiFi and Bluetooth!
First thing before we even think about using the MQTT functionality is to make sure that our Eduponics Mini board can connect to the WiFi and has network connectivity so we could proceed.
We can achieve this by creating boot.py file, this file will first load when our Eduponics Mini restart or the power plugged in, in this file we'll configure the WiFi credentials such as ESSID (WiFi name) and the WiFi password.
Once we've connected to the WiFi using the station.connect() command, we can print our ESP32 WiFi IP address into the console.
import network
import esp
import time
esp.osdebug(None)
import gc
gc.collect()

# set WiFi credentials
ssid = ''
password = ''

# check if there is username and password for wifi
if(ssid != '' and password != ''):

    station = network.WLAN(network.STA_IF)

    station.active(True)
    station.connect(ssid, password)

    timeout_interval = 10

    # try to connect with timeout interval
    for i in range(0,timeout_interval):
        if(station.isconnected() == False):
            time.sleep(1)
            pass
        else:
            break;

    if(station.isconnected()):
        print('Connected to WiFi successfully, IP: %s' % station.ifconfig()[0])
    else:
        print("Something went wrong, connection timeout, try again!")
else:
    print("Please add WiFi credentials properly")
Now every time we restart or power the Eduponics Mini board it will automatically connect to the WiFi at our home.
2.54GhZ WiFi support only
The ESP32 support only 2.54GhZ WiFi networks. Most of the 5Ghz WiFi routers / access points allow both 5Ghz and 2.54Ghz, make sure to choose the 2.54Ghz one.
Installing the micropython-eduponics library
The MicroPython-Eduponics library can be found on STEMinds Micropython-Eduponics repository the easist way to install the library is through uPip.
Make sure to change WiFi ESSID and Password. Once the ESP32 is connected to the Wifi, run the following commands:
import upip
upip.install("micropython-eduponics")
The installation should complete and once it's done you shall have a "lib" directory on your ESP32 device containing all the pre-requirements for this tutorial.
Another way would be to grab the firmwares directly from the repository and install them into your ESP32 device using the esptool mentioned in the first tutorials.
uMQTTSimple class
This class was taken from randomnedtutorials.com and it's extremely useful for what we are trying to achieve. this class will enable us to deal with the entire MQTT protocol (publishing and subscribing) with ease.
If you look at the initialiser you'll see we give it a couple of parameters such as server (we'll use a public server at mqtt.eclipse.com) and some other credentials we won't use such as username, password and other parameters.
We should save this python code into file we'll call umqttsimple.py and we will import it using the import command every time we want to use the MQTT functionalities to communicate through the MQTT network.
It's important to note that the class already exists in the micropython-eduponics library and if you followed the instructions above, you don't need to copy this class, it's for reference only.
import usocket as socket
import machine
import ustruct as struct
from ubinascii import hexlify

class MQTTException(Exception):
    pass

class MQTTClient:

    def __init__(self, client_id=hexlify(machine.unique_id()), server="mqtt.eclipseprojects.io", port=0, user=None, password=None, keepalive=0,
                 ssl=False, ssl_params={}):
        if port == 0:
            port = 8883 if ssl else 1883
        self.client_id = client_id
        self.sock = None
        self.server = server
        self.port = port
        self.ssl = ssl
        self.ssl_params = ssl_params
        self.pid = 0
        self.cb = None
        self.user = user
        self.pswd = password
        self.keepalive = keepalive
        self.lw_topic = None
        self.lw_msg = None
        self.lw_qos = 0
        self.lw_retain = False

    def _send_str(self, s):
        self.sock.write(struct.pack("!H", len(s)))
        self.sock.write(s)

    def _recv_len(self):
        n = 0
        sh = 0
        while 1:
            b = self.sock.read(1)[0]
            n |= (b & 0x7f) << sh
            if not b & 0x80:
                return n
            sh += 7

    def set_callback(self, f):
        self.cb = f

    def set_last_will(self, topic, msg, retain=False, qos=0):
        assert 0 <= qos <= 2
        assert topic
        self.lw_topic = topic
        self.lw_msg = msg
        self.lw_qos = qos
        self.lw_retain = retain

    def connect(self, clean_session=True):
        self.sock = socket.socket()
        addr = socket.getaddrinfo(self.server, self.port)[0][-1]
        self.sock.connect(addr)
        if self.ssl:
            import ussl
            self.sock = ussl.wrap_socket(self.sock, **self.ssl_params)
        premsg = bytearray(b"\x10\0\0\0\0\0")
        msg = bytearray(b"\x04MQTT\x04\x02\0\0")

        sz = 10 + 2 + len(self.client_id)
        msg[6] = clean_session << 1
        if self.user is not None:
            sz += 2 + len(self.user) + 2 + len(self.pswd)
            msg[6] |= 0xC0
        if self.keepalive:
            assert self.keepalive < 65536
            msg[7] |= self.keepalive >> 8
            msg[8] |= self.keepalive & 0x00FF
        if self.lw_topic:
            sz += 2 + len(self.lw_topic) + 2 + len(self.lw_msg)
            msg[6] |= 0x4 | (self.lw_qos & 0x1) << 3 | (self.lw_qos & 0x2) << 3
            msg[6] |= self.lw_retain << 5

        i = 1
        while sz > 0x7f:
            premsg[i] = (sz & 0x7f) | 0x80
            sz >>= 7
            i += 1
        premsg[i] = sz

        self.sock.write(premsg, i + 2)
        self.sock.write(msg)
        #print(hex(len(msg)), hexlify(msg, ":"))
        self._send_str(self.client_id)
        if self.lw_topic:
            self._send_str(self.lw_topic)
            self._send_str(self.lw_msg)
        if self.user is not None:
            self._send_str(self.user)
            self._send_str(self.pswd)
        resp = self.sock.read(4)
        assert resp[0] == 0x20 and resp[1] == 0x02
        if resp[3] != 0:
            raise MQTTException(resp[3])
        return resp[2] & 1

    def disconnect(self):
        self.sock.write(b"\xe0\0")
        self.sock.close()

    def ping(self):
        self.sock.write(b"\xc0\0")

    def publish(self, topic, msg, retain=False, qos=0):
        pkt = bytearray(b"\x30\0\0\0")
        pkt[0] |= qos << 1 | retain
        sz = 2 + len(topic) + len(msg)
        if qos > 0:
            sz += 2
        assert sz < 2097152
        i = 1
        while sz > 0x7f:
            pkt[i] = (sz & 0x7f) | 0x80
            sz >>= 7
            i += 1
        pkt[i] = sz
        #print(hex(len(pkt)), hexlify(pkt, ":"))
        self.sock.write(pkt, i + 1)
        self._send_str(topic)
        if qos > 0:
            self.pid += 1
            pid = self.pid
            struct.pack_into("!H", pkt, 0, pid)
            self.sock.write(pkt, 2)
        self.sock.write(msg)
        if qos == 1:
            while 1:
                op = self.wait_msg()
                if op == 0x40:
                    sz = self.sock.read(1)
                    assert sz == b"\x02"
                    rcv_pid = self.sock.read(2)
                    rcv_pid = rcv_pid[0] << 8 | rcv_pid[1]
                    if pid == rcv_pid:
                        return
        elif qos == 2:
            assert 0

    def subscribe(self, topic, qos=0):
        assert self.cb is not None, "Subscribe callback is not set"
        pkt = bytearray(b"\x82\0\0\0")
        self.pid += 1
        struct.pack_into("!BH", pkt, 1, 2 + 2 + len(topic) + 1, self.pid)
        #print(hex(len(pkt)), hexlify(pkt, ":"))
        self.sock.write(pkt)
        self._send_str(topic)
        self.sock.write(qos.to_bytes(1, "little"))
        while 1:
            op = self.wait_msg()
            if op == 0x90:
                resp = self.sock.read(4)
                #print(resp)
                assert resp[1] == pkt[2] and resp[2] == pkt[3]
                if resp[3] == 0x80:
                    raise MQTTException(resp[3])
                return

    # Wait for a single incoming MQTT message and process it.
    # Subscribed messages are delivered to a callback previously
    # set by .set_callback() method. Other (internal) MQTT
    # messages processed internally.
    def wait_msg(self):
        res = self.sock.read(1)
        self.sock.setblocking(True)
        if res is None:
            return None
        if res == b"":
            raise OSError(-1)
        if res == b"\xd0":  # PINGRESP
            sz = self.sock.read(1)[0]
            assert sz == 0
            return None
        op = res[0]
        if op & 0xf0 != 0x30:
            return op
        sz = self._recv_len()
        topic_len = self.sock.read(2)
        topic_len = (topic_len[0] << 8) | topic_len[1]
        topic = self.sock.read(topic_len)
        sz -= topic_len + 2
        if op & 6:
            pid = self.sock.read(2)
            pid = pid[0] << 8 | pid[1]
            sz -= 2
        msg = self.sock.read(sz)
        self.cb(topic, msg)
        if op & 6 == 2:
            pkt = bytearray(b"\x40\x02\0\0")
            struct.pack_into("!H", pkt, 2, pid)
            self.sock.write(pkt)
        elif op & 6 == 4:
            assert 0

    # Checks whether a pending message from server is available.
    # If not, returns immediately with None. Otherwise, does
    # the same processing as wait_msg.

    def check_msg(self):
        self.sock.setblocking(False)
        return self.wait_msg()
MQTT Main client
The final step will be to create our main program, we should start by creating an empty file called main.py this file will be the second file to run once the system reboot/boot (the first file will be boot.py) main.py will run once we've successfully connected to the WiFi network.
In main.py we will import our umqttsimple library we've created earlier and configure few data point in advance for our MQTT client to use.
Unique UUID
A lot of devices will connect to the broker and if we'll use a topic like "living_room/light" how to define our light from hundreds of other devices use the exact same topic? off course one solution will be to own our private broker, this will solve the case. but for us, we will use a public one for this example.
In order to identify our device we'll need to generate a unique UUID for it, there are 2 ways to do that:
- use UUID generator online
- generate using MicroPython command
For the first example, we could head to uuidgenerator.net and copy paste the automatically generated UUID for us.
If we want to use the second option, here is a MicroPython example code to generate unique UUID, there are few kinds: unique based on host ID and current timestamp which is what we recommend, a UUID based on MD5 hash of a namespace (if you use this method, make sure to change steminds.com to something else, something random) and the last option to generate a random UUID.
import uuid

# make a UUID based on the host ID and current time, best option.
uuid_x = uuid.uuid1()
print(uuid_x)

# make a UUID using an MD5 hash of a namespace UUID and a name
uuid_y = uuid.uuid3(uuid.NAMESPACE_DNS, 'steminds.com')
print(uuid_y)

# make a random UUID
uuid_z = uuid.uuid4()
print(uuid_z)
Once you have your unique UUID we can continue to the next step of creating the actual client, make sure where it says
UUID = "YOUR_UUID_GENERATED_ID"
Replace "YOUR_UUID_GENERATED_ID" with your custom generated UUID.
The following MQTT client will subscribe to one basic topic called "living_room/light" and every 1 second (where message interval is, you can change that to any number for longer or shorter interval) will publish the current light state which in our example doesn't change, it will always be 1. (light status = 1)
If we'll get messages back at "living_room/light" topic, it will go directly to on_message_callback() function which will print the topic and message into the console.
This is just an example to demonstrate a very simple and basic MQTT client and how it works.
from Eduponics import umqttsimple
import machine
import time
import json

# MQTT Unique ID
UUID = "YOUR_UUID_GENERATED_ID"
# MQTT Topics
topics = ["living_room/light"]

def on_message_callback(topic, msg):
    '''
    get the message and topic and print it
    '''
    print((topic, msg))

def connect_and_subscribe():

    print("[-] Connecting to MQTT client ...")
    # set the MQTT broker object
    client = umqttsimple.MQTTClient()
    # set a callback for incoming messages (subscribed topics)
    client.set_callback(on_message_callback)
    # connect to the broker
    client.connect()

    # subscribe to the topics
    for topic in topics:
        client.subscribe("%s/%s" % (UUID,topic))
        print("[-] Subscribed to %s successfully" % topic)
        print("[-] Connected to %s MQTT broker successfully" % client.server)

    return client

def restart_and_reconnect():
    # something  went wrong, reconnect in 5 seconds ...
    print('[-] Failed to connect to MQTT broker. Reconnecting...')
    time.sleep(5)
    machine.reset()

try:
    client = connect_and_subscribe()
except OSError as e:
    restart_and_reconnect()

# configure few variables
last_message = 0
message_interval = 1

# dummy light status of the living room
light_status = 1

while True:
    try:
        # check if there are new messages pending to be processed
        # if there are, redirect them to callback on_message_callback()
        client.check_msg()

        # check if the last published data wasn't less than message_interval
        if (time.time() - last_message) > message_interval:
            client.publish("%s/home/living_room/light" % UUID, light_status)
            print("[-] published light status: %s" % light_status)

            # update last message timestamp
            last_message = time.time()

    except OSError as e:
        # if something goes wrong, reconnect to MQTT server
        restart_and_reconnect()
Subscribing through mosquitto CLI
In order to see the published data from our ESP32 Eduponics mini kit to the MQTT broker network, we'll need to subscribe to it from our machine (your PC / laptop).
Earlier on we've installed mosquitto CLI and now we are going to use it to archive it.
On your machine open terminal / console and type the following:
mosquitto_sub -h mqtt.eclipseprojects.io -p 1883 -t "UUID_GOES_HERE/living_room/light"
Make sure to change the line that says:
"UUID_GOES_HERE"
With your UUID that you've generated and inserted into your ESP32 device. If everything goes well, every time the ESP32 will publish to the MQTT broker you should see it on your machine using the MQTT CLI:
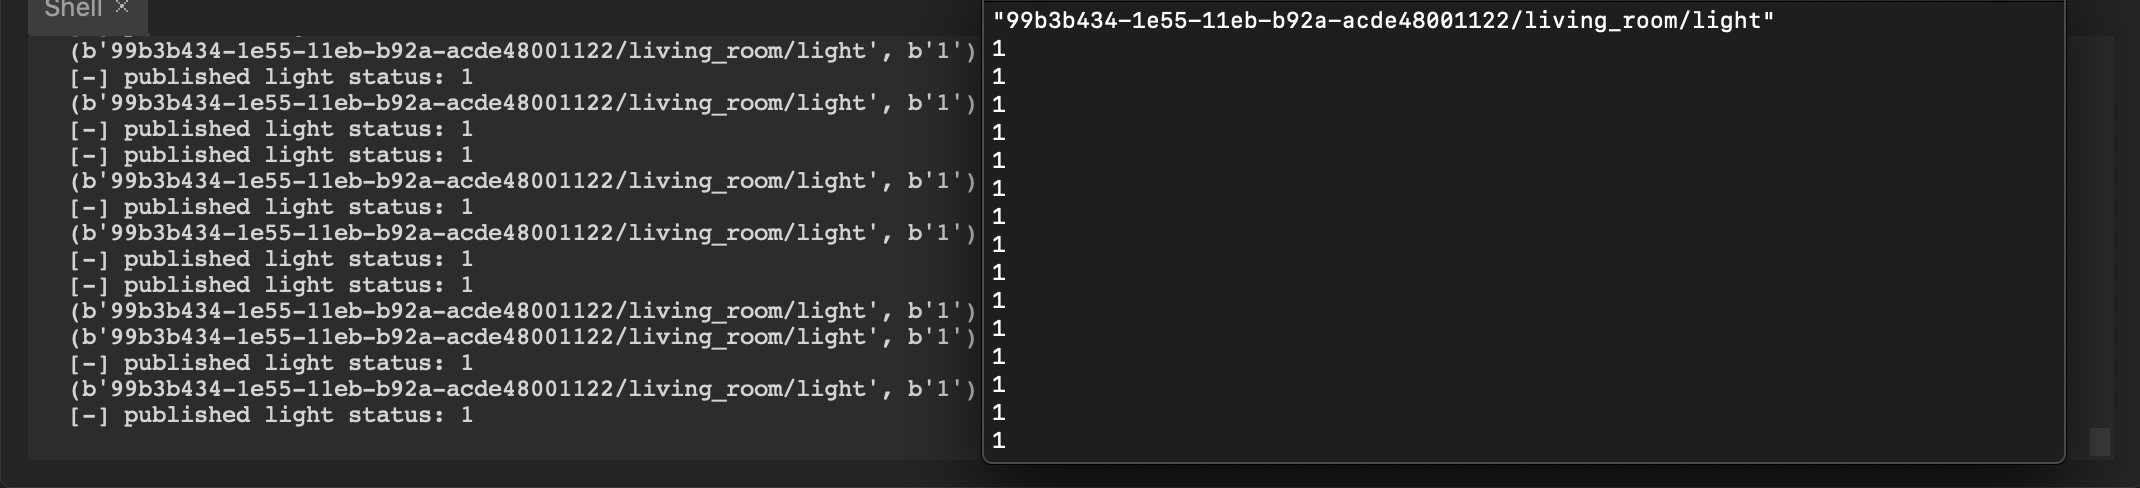
As we always publish the same static data (integer 1) there is nothing much to see or operate except the proof that it works, next we'll move to real life application using the Eduponics Mobile APP to receive and control the sensors on top of our Eduponics Mini board!
Do you not use the UUID shown in the picture above
You should generate your own unique UUID using the examples we've given earlier, failing to do so might compromise your application to strangers in real life applications.